Blog Archives

Spring and Early Summer Update at PsiKeep
It was a hard spring at PsiKeep. I held off working on the blog while I was putting together poems and photo essays on the fires of last summer. But things continued to press on with miracles and disasters wrapped together in the web of life.
Sad Sheep Story
Both Soay ewes had stillborn lambs.
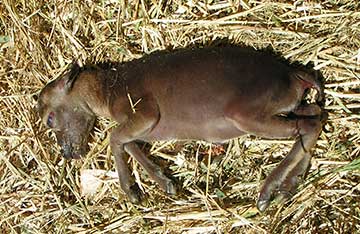
I lost the first ewe before I could figure out what happened. Neither ewe could not expel the placenta after birth.
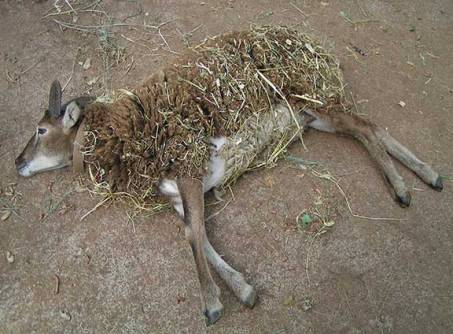
I was able to save the second ewe with a lot of painstaking effort to slowly and carefully get her to drop her placenta over a period of several days. But the little ram… I do not know what to do with him. It seems with all the careful effort keeping him in the stall while the first fracture mended, he broke another leg.
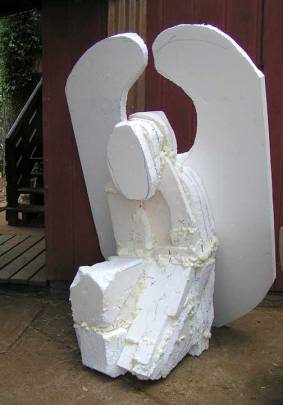
Sculptures in Progress
First there was “Warrior Angle Crouching” in the beginning work-in-progress stage.
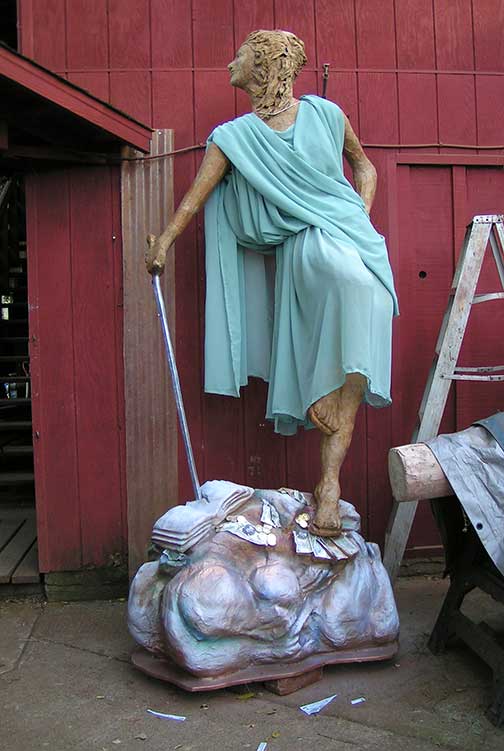
There was naked Justice getting repaired for the MAC show in Middletown.
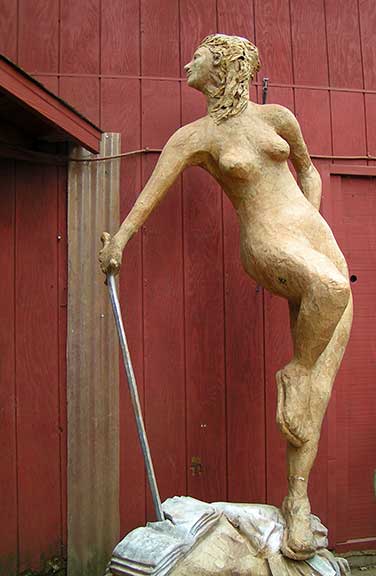
There was hooded Justice waiting out the late rains.
And finally there was re-dressed “Justice Corrupted” ready to be trucked to the show.
Street Adventures
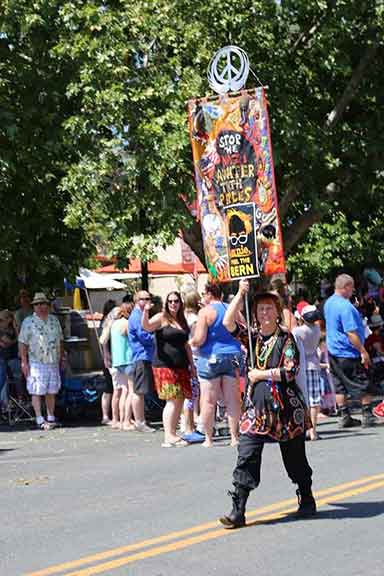
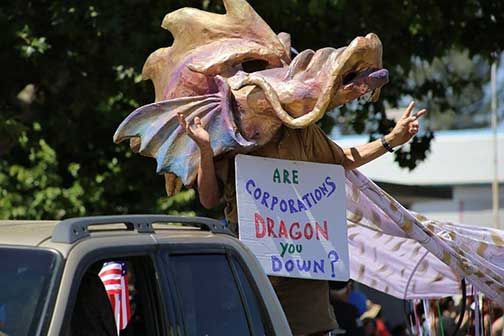
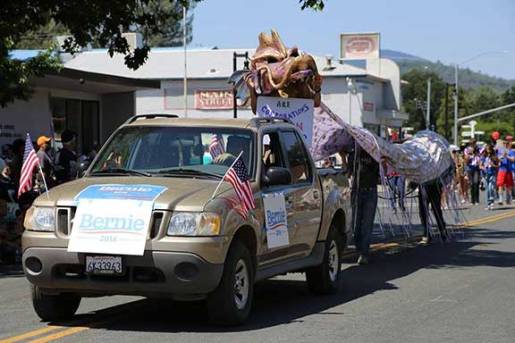
I did marched for Bernie for President at the Lower Lake Memorial parade. We even got the dragon in the show.
The Ravens at PsiKeep
Yesterday as I was putting this post together I heard a commotion from the ravens outside. Every year they build their nest in the ponderosa tree above my front door. By their raucous screaming I knew what had happened. It did not take me long to find their single offspring on the ground at the bottom of the tree. I gently picked up the little guy. This was his big day, his first flight out of the nest. I set him on the banister so he could get a good start but he jumped down on to the porch instead.
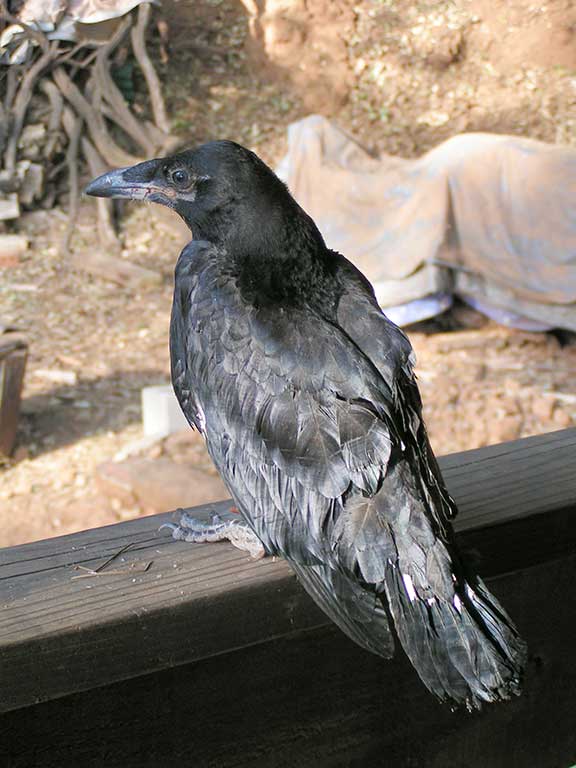
So I carried him down to the orchard and set him in one of the fruit trees. Later I saw him making a low flight into the forest. I hope he made it. Although, this morning, I have not seen him up in the tall trees with the parents.
Last of all there are days of cutting brush under the ghost of last year’s catastrophic fires. More on the result of those fires is yet come in the form of art and poetry. Because what else can you do but produce creative energy in the face of all that destruction.
A Few Notes on the Summer Brush Clearing
Sorry for this brief post after such a long silence but most of the adventure has been trying to get PsiKeep ready for the fire season.

Cutting Weeds to the horizon
Today we plowed the road. Brush cutting to the horizon in the shoulder tall grass.

Tree limb breaking from the main tree.
This looks like a match stick 90 feet up in the air. But these Blue Pines are so large due to the water table flowing down the bowl shape of this property, even in this drought. When is falls it will be a very loud crash. We can do nothing but wait the inevitable.

Close of the broken limb hanging 90 feet in the air.
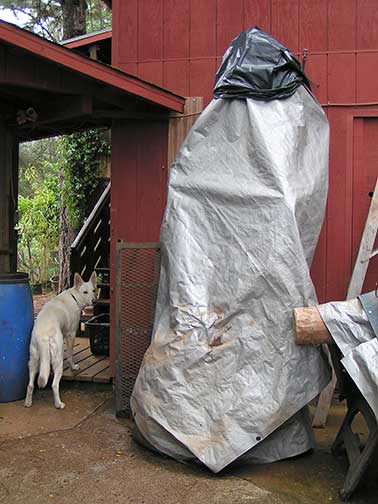
The dragon is coming. Looking for a crew to move it into place in order to begin the final installation.

The Dragonhead Walkway still tarped and waiting to be completed.
I normally do not do this but because this is such a historic day I have to post this image.

June 26, 2015, This is a historic day for America.
Quick Update on the Mushroom Wedding Arch
Just a few words on the construction of the Mushroom Wedding Arch.
Almost all the gills have been sculpted. So I brought in a few leaves for contrast and focus.

View of work table and Mushroom Wedding Arch under construction
I applied the first layer of green cement. Next I will apply a coat of the background color to detail the edge of each leaf so that terms of the cement structure there will be no separation between the leaves and the background.

Leaves sculpted on the Mushroom Wedding Arch under construction
Interesting that the leaves are the same color as the leaves of the wild tobacco plant on the right side next to the arch.
![]()
First Coat of Cement on the Mushroom Wedding Arch
Yeah!
The first coat of cement applied to the uprights of the Mushroom Wedding Arch was completed today.
I used a brown coloring for the first coat of cement so that if there is any chipping it will blend in rather than reveal the white cement underneath. Any cables you see in the images are there for temporary support until the footing has been revised.

Left upright and upper portion of the buttress covered with the first layer of cement

Right upright and buttress

Detail of the upper portion of the right upright
Just when I want to collapse on my laurels, I know that the real work is just beginning. The next stage is to detail the mushrooms by sculpting the cement to create the gills and cones using different colors and textures. This portion will have to be done slowly and the expected time of completion will not be until next year.
Installing the Top Section of the Mushroom Wedding Arch
Continued from Moving Forward with the Mushroom Wedding Arch
at http://wp.me/p3akRr-ht

Top section of the Mushroom Wedding Arch
Two days of last-minute preparation left me exhausted before we even began this venture.
On Saturday November 24, I was still setting the eyes in the goat’s head and cleaning grout off of the solar disk. On Sunday morning I was up at dawn clearing the pathway in the shop so we could carry the section out the door.
Would this day be razor blades or champagne?
We started out with three volunteers, Lorna Sides, Tim Williams, Dante de Amicis and myself. We quickly discovered that the plan was not going to work. There just was not enough manpower to lift the section into place. Just as we were looking at option two, which was to move the section on to an outside table and tarp it for the winter, two more volunteers arrived, Terri Larsen of and her husband Peter Shifman. We thought with this many people we might have a chance. It was back to “plan A”. This consisted of carrying the section out of the shop, across the yard, up the steps to the uprights and lifting it into place.

Installation crew inside the shop

Carrying the top section to the uprights
When we discovered that we could not physically lift the section into place without some sort of aid, we moved the old well shed tower between the steps and lifted the section onto the top of the tower before making the final lift on to the uprights.

Crew with the tower from the well shed
Surprisingly the last step went easy. For months I worried about lining up the four unions, which were the connection between the uprights and the top section of the arch. I decided to complete the top section first and attach it into place before cementing the uprights so that I could adjust the exposed armature to fit the two together. In the end there was only one connection that needed a little easing. We used a crowbar to line up the union threads between the two structures and screwed them together with a pipe wrench.

Crew lifting the section from the top of the well shed tower to the top of the uprights

Top section of the arch secured into place.
Today the goddess gave us a reason for champagne and Lorna presented a surprise birthday cake for me. Ah! 70 years inside this body,which I always thought was a mistake but in spite of that it has served me well.

Lighting the candles of the birthday cake
Later we had a Thanksgiving feast inside the house.

Feasting in celebration
The next steps in constructing the Mushroom Wedding Arch will be to cement in the steps for the footing, reinforce the side panels to eliminate the side-swaying, laminate the carved Styrofoam side panels to the uprights, and cement the uprights. This will probably be accomplished in the spring or early summer of next year. Until then I need to secure this top-heavy sculpture from getting knocked over in a windstorm.
Moving Forward with the Mushroom Wedding Arch
Bringing Home the Cement
The cement company came through with their replacement sacks of cement. It was quite a journey bringing them over the mountain to the property.
I am stranded without a vehicle. My friend, Lorna Sides, offered her VW Turbo to go and pick up the cement. For the past few months she has been in the market looking for a car. So she did not really purchase a car to haul the cement but at the end of the day it looked pretty close to that.
In the parking lot of the Honda dealership, and after many hours of going though the long process of purchasing her new car, we transferred half of the 750 lbs of cement from the very low riding VW to her new Honda. Those car guys must have thought we were absolutely crazy as they watched these two little ladies putting all those sacks of cement into the back of her new car. Together with both cars loaded with cement we caravanned back over the mountain with our haul.
Turning the Top Section of the Mushroom Wedding Arch
A week later a friend came by and rigged a come a long winch so we could lift the top section of the Mushroom Wedding Arch and re-position it face upward on the work table in the shop.

The next step is to finish the final coat of cement on the front side of the top section.
Detailing the Side Panels of the Mushroom Wedding Arch

The side panels are being detailed in the carving shop, which is really the goat barn in the winter months. They are almost ready to be attached to the foam uprights which cover the armature. Once these panels are attached in place the first layer of cement will finally be applied.
The goal is complete the Arch before the before the weather turns cold.
Update on the Mushroom Wedding Arch
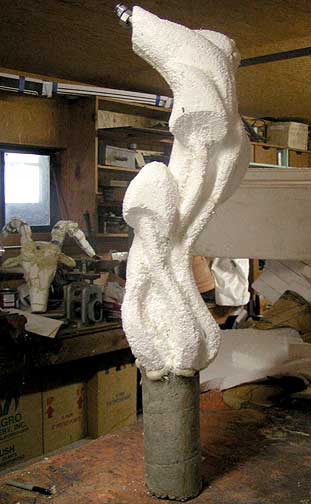
Today I covered the extended armature for the uprights with Styrofoam. After three years of drawing, constructing the armature and carving foam, what do I have to show for it, two pillars of foam stuck in the ground. It all looks pretty sorry!

Backside of the uprights for the Mushroom Wedding Arch
But all is not lost. Noticed the exposed pipe on the right pillar. I left that portion of the armature exposed so that I had some wiggle room in bending the armature in case the top section of the arch does not fit together when it is time to install it.
Working on a piece like this can be very time-consuming. It is easy to adjust bare pipe and re-carve the Styrofoam if things are not fitting together. But once the cement goes on there is no room for error.
Speaking of the cement, the company made good on their product and credited me with 15 bags to replace the ones that were acting like a fast-set and setting up before I could trowel the cement on to the foam.
Unfortunately I am without a vehicle this week. Until I can arrange to get a working vehicle, I wont be able to pick up the replacement sacks.
Below is a photo showing the application of the second coat of cement to the left side of the arch lying face downward on the work table.

Left side of the top section of the arch facing downward on the work table.
SPECIAL NOTE:
Don’t forget to visit my new and second blog at http://tenabraecafe.wordpress.com/. Sign up at the Tenabrae Cafe for a notice of new postings. Looking forward to meeting with you there.
Updates at PsiKeep
A day at PsiKeep begins with a bloat and ends with a bang.
Treating Bloat in San Clemente Island Goats
This morning I found myself dealing with a case of bloat in one of my does. As I was setting out the feed I saw that she was a balloon! She was as wide as she was long and standing listlessly under the trees by the feeder. By the time I got the olive oil and a turkey baster prepared she was lying down and looking pretty miserable. It was easy for me to catch her and put her up on the stanchion. I administered 2 turkey basters full or about 120 cc of olive oil slowly against the inside cheek of her mouth. Two hours later she was back down to a normal size and eating. Lucky I caught this one in time.
Singing Plants in the Garden
It is the time of the shower of the Pleiades and summer is dwindling into autumn with the promise of one or two furnace days ahead. I was walking back up from the goat pens through the Garden of Earthly Delights, the euphorbia and cactus collection at PsiKeep.

The path through the Garden of Earthly Delights, the euphorbia and cactus collection at PsiKeep.

Several cactus and euphorbia growing at PsiKeep
The ordeal of treating the bloating goat made me sit down on one of the ledges of the terraces and rest for moment. This is not something I normally do. I am always racing to the next project as soon as I complete the current one. I have a hard time relaxing. I am the one who orders the relaxation tapes back in the days when we were using cassettes and never broke the cellophane seal on the package. A long time in the grave for resting.
But this particular morning I forced myself to sit down and take a look around at what I am trying to do with this place.
As I sat there watching the San Pedro cactus and several of the other euphorbia, which I had planted a month ago, I noticed that they were glowing. I stepped closer to investigate. I could see that it was the position of the late morning sun above and behind the cactus and that the light was bouncing off of the fluid in the plant.

Example of euphorbia, which appear to be glowing
But there was something else. I could almost hear the sound of the capillary action as the inside the plant thrust upward, step laddering cell-by-cell toward the sky.

The growth center of a euphorbia
Out at the edge of the nub where new tissue was unfolding into the geometric five and six faces of the plant, there was a singing but there was no audible sound. It was an empathy of the same fluid within me unfolding, becoming, rising toward the light. And for a moment I felt at one with all that was around me. Blood, sap water, all the intricate fluids of life thrusting from the great wellspring of the earth into the infinite facets of being.
Of course I had to run into the house and get my camera and take the photos of the plants and then I had to write down what I saw and put it into the computer all the while leaving that small miracle trailing behind me while I walked into the day with my shopping list of things to do.
Sculpting the Mushroom Wedding Arch

Second coat of cement with detailing of the mushroom gills on the top section of the Mushroom Wedding Arch
Construction has stumbled to a standstill. Three out of the four sacks of cement I opened were setting up like a fast-set mixture. Something in the dry ingredients is wrong and as soon as I add the liquid to the cement it begins to set. It is crystallizing in the bucket before I can even trowel it out to spread on the surface of the sculpture.
I had called the company several days before leaving messages regarding the cement but no one had returned my calls. When I could no longer sculpt the gills of the mushrooms I stamped up the stairs to the phone and prepared for battle. After a number of phone calls and email messages I got the right number and that person referred me to the area rep.
I started out by representing myself as a contractor loosing money on a job because of the faulty cement. I figured I would get a better response than if I represented myself as a sculptor but this guy recognized me right away. “Oh your that instructor who is using our product in the way it is not supposed to be used.”
I could not believe it! I must have talked briefly to this guy back in 2009 when I had another problem with the chemistry of their product. I told him that I had been using it “in the way that it was not supposed to be used” but that it was working for me for a number of years and that maybe they ought to rethink how their product could be used. It might even open up a bigger market for them. But that was not the issue. The cement was setting up in the bucket before I could apply it “in the way it was not supposed to be used.”
After some haggling he said he would see about exchanging the fifteen sacks and would call me back on Monday.
Ravens
This year’s raven offspring have flown away. I occasionally see them. When they arrive they are like gang busters, squabbling and squawking with each other. The littlest one I call “Little” is still alive. I did not have much hope for that one since he was so far behind the others in growth and size. But he is still hanging in there and seems more aggressive and forward than the other two.
The parents remain guarding their territory.

Image of the author feeding a raven
They spend most of the day in the blue pines or prowling in the goat pens. I feed them once a day and they have plenty of water so I imagine they have found paradise. The only time they disappear is at dusk when they fly off somewhere to a roost for the night. I have no idea where their roost is located.
Brush Fire
This is not the image you want to see at the end of the day. Ten miles away it holds a warning of things to come.

Wild fire that started at the end of the day.
SPECIAL NOTE:
While the saga of PsiKeep continues you might like to visit my new and second blog at http://tenabraecafe.wordpress.com/. Sign up at the Tenabrae Cafe for a notice of new postings. Looking forward to also meeting with you there.
Mushroom Arch – Constructing the Buttresses: Part 5
The buttresses were built in 2010. While waiting for information on how to move forward with the cement that appears to be setting up too fast, I came across images showing the construction of the buttresses. I have put several images up on this post with the hope that it will further illustrate the construction process. Please note that the images are of different sides of the two buttresses.
A groove is carved into the two halves of the Styrofoam so that the two halves of the foam will fit around the steel armature seen on the left. The lower part of the armature is incased in cement in order to be installed in the ground.

Two halves of the Styrofoam are carved to fit around the steel armature.
The two halves of the Styrofoam are glued together. Clamps hold the Styrofoam in place until the adhesive sets up.

The Styrofoam is clamped together while adhesive hardens.
More pieces of Styrofoam in the rough shapes of mushrooms are glued on to original Styrofoam and carved in place.

Rough carving of Styrofoam
This images shows the final detail carved into the Styrofoam. The buttress is ready to cover with cement.
The carving of the Styrofoam is completed and ready to be covered with cement.
The first layer of cement is applied over the Styrofoam.

Buttress with the first coating of cement.
A second layer of cement is applied with different colors to differentiate between the gills and the caps of the mushrooms.The detail on the gills is carved into the cement.
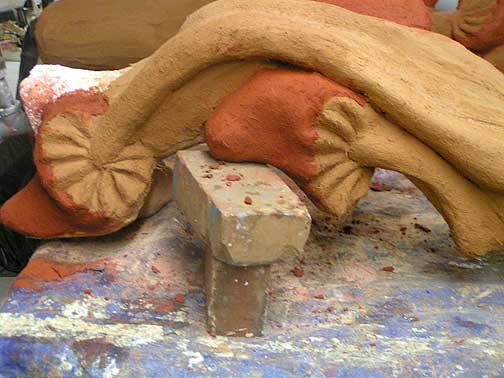
Detail of buttress with the second coating of cement.
The buttresses were installed in the ground and attached to the upright pillars of the arch.

Completed buttress (image from previous post) in place on the Mushroom arch.
SPECIAL NOTE;
While the saga of the Mushroom Wedding Arch continues you might like to visit my new and second blog at http://tenabraecafe.wordpress.com/ Sign up at the Tenabrae Cafe for a notice of new postings. Looking forward to also meeting with you there.
More on Constructing the Mushroom Arch: Part 4
Weeks have past. The upright sections of the arch have been roughed out but the details have yet to be carved.
To get an overall view of the arch, the Styrofoam sections were temporary tacked together before the goat’s head was secured in place.

Temporary view of the mushroom arch without the goats head.
The carving on the top section of the arch has been completed in Styrofoam. But there have been delays.
I was busy watering the goats on the evening before I was to begin the cement work the following day. As I walked by the top section of the arch standing on the work table, I saw right away there was something wrong. I did not like the transition from the sides into the horizontal portion of the arch. It was too angular. In the twilight the goats head looked like a football player; one of the Rams to be exact. I had secured the horns about three inches above the armature and when I filled in that space with Styrofoam it looked like athletic shoulder padding.
So the next day I dragged the work back into the shop and spent a week revising the top section of the arch. I dug out the metal straps that secured the horns to the armature and lowered the horns about two inches. I also sculpted new mushrooms around the area where the horn touch the arch.

Top section of the revised Mushroom Arch (front view) carved in Styrofoam

View of revised back side
Cementing the arch is running into more problems and the completion of this project by the end of summer is fading fast. The first layer of cement was being applied in the middle of a heat wave when the troubles began. Even though the cementing was taking place inside the shop where was only 80°F, the cement was setting up much faster than normal.

View of top of arch with a portion covered with the first layer of cement.

View of underside of the arch including the “ribbon” which will hold the text. The “ribbon” will be secured under the goat head.
This project is stalled out until I solve what is happening to the cement. I do not want to put hundreds of hours into this construction only to have it crumble within a few years. I have had problems with Quikrete products before. I hope this is not going to be one of them.
